Tuesday, July 27, 2021

HS Produkt VHS-2 Airsoft Replica Build [Part 3: Grip and Fire Controls]

Okay, so now we get to a real pain in the ass part of this build: the grip, trigger, and fire selector.

 
The grip and fire controls are comprised of the following parts:
  • Grip (housing)
  • Trigger
  • Trigger PCB button
  • Trigger switch mount
  • Trigger spring
  • Rotary potentiometer
  • Rack
  • Pinion x2
As you may have figured out from that list, the trigger just activates a PCB button. The real meat and potatoes of this fire control group is the fire selector. We're spinning a rotary potentiometer to select the firing mode, but this introduces challenges. 

Namely, I can't just hook up a potentiometer to the selector switches themselves. This would employ two potentiometers that are not synchronized (one for each half). There are rotary pots that allow a keyed shaft through the center, but this requires more machining than I'm capable of doing with my current setup. 

The solution, of course, is a rack-and-pinion:

Imagine another pinion sitting between the trigger and that pinion on the potentiometer. This translates the rotation from the fire selector downwind to the potentiometer, allowing an Arduino to pick up the position. Also imagine a PCB switch on that little shelf in front of the trigger - that translates trigger movement into a readable position as well. Clever, huh? Big shoutout to janssen86 on Thingiverse for the parametric helical rack and pinion model he made, though I did modify the hell out of it to fit in the grip and to not be helical. 

I printed the rack and pinion out of Dr.3D ABS-like resin, which I have been VERY impressed for at the price (it costs about as much as normal UV resin, but comes in 500g bottles instead of 1kg).


That's it for the grip and fire controls. Took far too much effort, too many re-prints of tiny resin parts. See you next time for the lower receiver. Worth noting, there will possibly be a significant amount of time before the lower receiver part is published - I have to do more test fitting prints, which means more hours into printing parts destined for the garbage can. I have queued posts to release once per week to prevent this from being too bad, but if you're keeping up with the project, just be aware.

-Craig, ETW

HS Produkt VHS-K2 Airsoft Replica Build [Part 2: Upper Receiver]

Alright, with the barrel assembly done, now it's time to do the rest of the upper receiver.

I split the upper receiver into four parts due to the size - two for the top rail, two for the actual upper receiver body. 

The longest piece of this assembly is 300mm. This would unfortunately end up being slightly tool tall to print on the Ender 3, so I had to take... action:

I also have a Creality CR-10S5, which is an absolutely enormous printer - so enormous that it prints everything poorly unless I have it print at a snail's pace even after hundreds of dollars of upgrades, so it's mothballed. I decided to take the Z axis extrusions and lead screw off to put on the Ender 3. The E3 can't travel all the way up the new Z axis due to the cable loom length, but I'll make an extension later. It's long enough for this part, at least.

Printing the rear receiver half was much simpler, as it's only around 150mm long.

The extension to the chamber block is now serving part of its purpose - to affix the rear end of the barrel assembly to the upper receiver using two M3x8 screws. There is a slight protrusion on the back to lock the upper into the lower - more on that later.


And there it is, the upper receiver all printed. The gap between the two rail sections is an unfortunate result of stacking tolerances - luckily, these aren't critical, but I will probably end up replacing the top rail with an adjusted version later. I haven't started the charging handle yet because I may be having part of it machined out of aluminum for me, as 3D printed options for the "knuckle" will probably end up being too fragile long-term.


So yeah, upper receiver's all done. On to the grip and fire control group. Next time!


-Craig, ETW


Tuesday, June 29, 2021

HS Produkt VHS-2K Airsoft Replica Build [Part 1: Barrel Assembly / Mock Gas System]


This is the barrel assembly and mock gas system for the VHS-2K. Everything pictured in silver is going to be a metal component - most parts will be aluminum for ease of machining on my very basic lathe setup, but the springs and spring shafts will be steel.

Each of the featured parts has a specific name. Familiarizing you with all of them would be quite a pain in this format, so for the sake of brevity, here's just the names of the relevant parts, front to back:

  1. Gas block adjustment knob (PLA+)
  2. Gas block (PLA+)
  3. Accumulator (Aluminum: 12mmOD, 10mmID)
  4. Forward interface (PLA+)
  5. Piston (Aluminum - 10mmOD, 3mmID)
  6. Charging handle interface (PLA+)
  7. Charging handle spring guide (x2) (HSS)
  8. Charging handle spring (x2) (Steel)
  9. Chamber (PLA+)
  10. Chamber extension (PLA+)

The majority of these parts exist so the charging handle can be pulled and not break something. I also wanted the charging handle to feel substantial when you pull it and wanted to try to use this assembly to counterbalance the relatively hefty FAMAS gearbox, hence making a lot of it out of aluminum and steel rather than just plastic.

In order to successfully mount the gas block in such a way where it would key to the outer barrel, I needed to print a jig to guide a drill bit so I could easily cut out just a small amount of material perfectly aligned with the top of the barrel key in the rear. Luckily, from the host replica's gas block, there were two divots in the bottom of the barrel I could use as keys.


The damage to the jig was planned - it was made a very tight fit so it wouldn't rotate easily while drilling, so removing it damaged it a bit. The drill bit unfortunately walked very slightly on the front cut, but the visible offset is mostly just surface-level and doesn't affect anything.

With that done, it's finally time to start printing and machining parts.

One, two... skip a few...


Machining the "piston" SUCKED because the only tooling I have for my crappy little lathe is a single cutoff tool and a dull HSS cutting tool. Took me around 2 hours to get it done as a result, taking away a hair's width of aluminum at a time... but it's done now. Later I will probably buy some cheap tooling to do a finishing pass and then give it a mirror finish with some sanding pads and buffing compound. Totally fine for now, though.

I initially designed some clips to go on the front of the spring guide rods to retain the charging handle interface and the springs, but realized as I was assembling everything that they weren't necessary. The only retaining clip I wound up keeping was on the rear of the charging handle interface (dead center in the second picture) - and that's just to allow the charging handle to actually pull the piston rod back.

I used aluminum pin stock to make the indexing/fixing pins for each of the parts that needed them - here's the gas block for example. I cut them with a band saw and added chamfers by chucking them in my drill press and raking them with a file. Didn't need to be exact, just needed to easily slip into the holes and not get caught up on anything.


And that's all there is for the barrel assembly and mock gas system. All things considered, this went together really easily, and I'm quite happy with the end result. In the next part, we'll get started on the upper receiver and fitting the barrel assembly into it.
 
-Craig, ETW

Wednesday, June 23, 2021

HS Produkt VHS-K2 Airsoft Replica Build [Part 0: Introduction]

This is the HS Produkt VHS-2.


Often seen in video games looking for an exotic, "sci-fi"-looking assault rifle that actually exists somewhere. Allegedly, the Croatian military uses these.

Have you ever seen The Fly with Jeff Goldblum? Basic synopsis: Man creates teleportation machine. Fly sneaks in on accident when he teleports, and he comes out the other end having been turned into a horrifying fly-man monster. Now replace Jeff Goldblum with a FAMAS, and the fly with every noteworthy polymer rifle ever designed, and you have the VHS-2. It is a short-stroke piston bullpup rifle that gets very very hot when you shoot it. The controls are fully ambidextrous, and almost everything about what it looks like on the inside is a complete fucking mystery for some reason.

I never really noticed the VHS-2 until using it heavily in Insurgency: Sandstorm, and slowly over time I've come to love the design

Unfortunately, as it is in the airsoft industry, nothing's being made unless it's an M4, AK, or some other incredibly popular weapons platform that has every right to dominate any related industry it finds itself in. Until the VHS-2 somehow ends up in a popular movie or video game title, it'll probably never find a spot in the airsoft industry.


That's why people like me exist, I suppose.


Visually capable individuals will note the "belly" on the stock, which has replaced the forward assist and length of pull adjustment. This was necessary to fit the V1.2 FAMAS gearbox. 

I initially began the process by searching for a model I could simply modify into a functional chassis, but quickly realized that the only free, publicly-available VHS-2 models were either very low poly or had design inaccuracies in the worst possible places to have them... so I started making my own, from scratch.

Now, this isn't the HCC-2A project from years back, and I'm not the inefficient modeller that I used to be. This was no year-long journey of introspection to learn how to extrude a box and use boolean modifiers. I went from absolutely nothing to nearly done in about 10 hours of work spread over a week in my down time. There's still minor details left to go - charging handle, dust cover, and mock bolt are the big ones - but the bulk of the work is done now.

Of course, I haven't said a word about the insides yet.

 
The boring stuff: it'll use a 14.5" M4 outer barrel, a 363mm inner barrel, and a G36 magazine (the G36 magazine is so close to the VHS-2 mag that I really don't see a purpose in making my own magazines).
 
Because I hate myself, rather than just making this an HPA engine chassis, I've decided to make it an AEG.
 
 
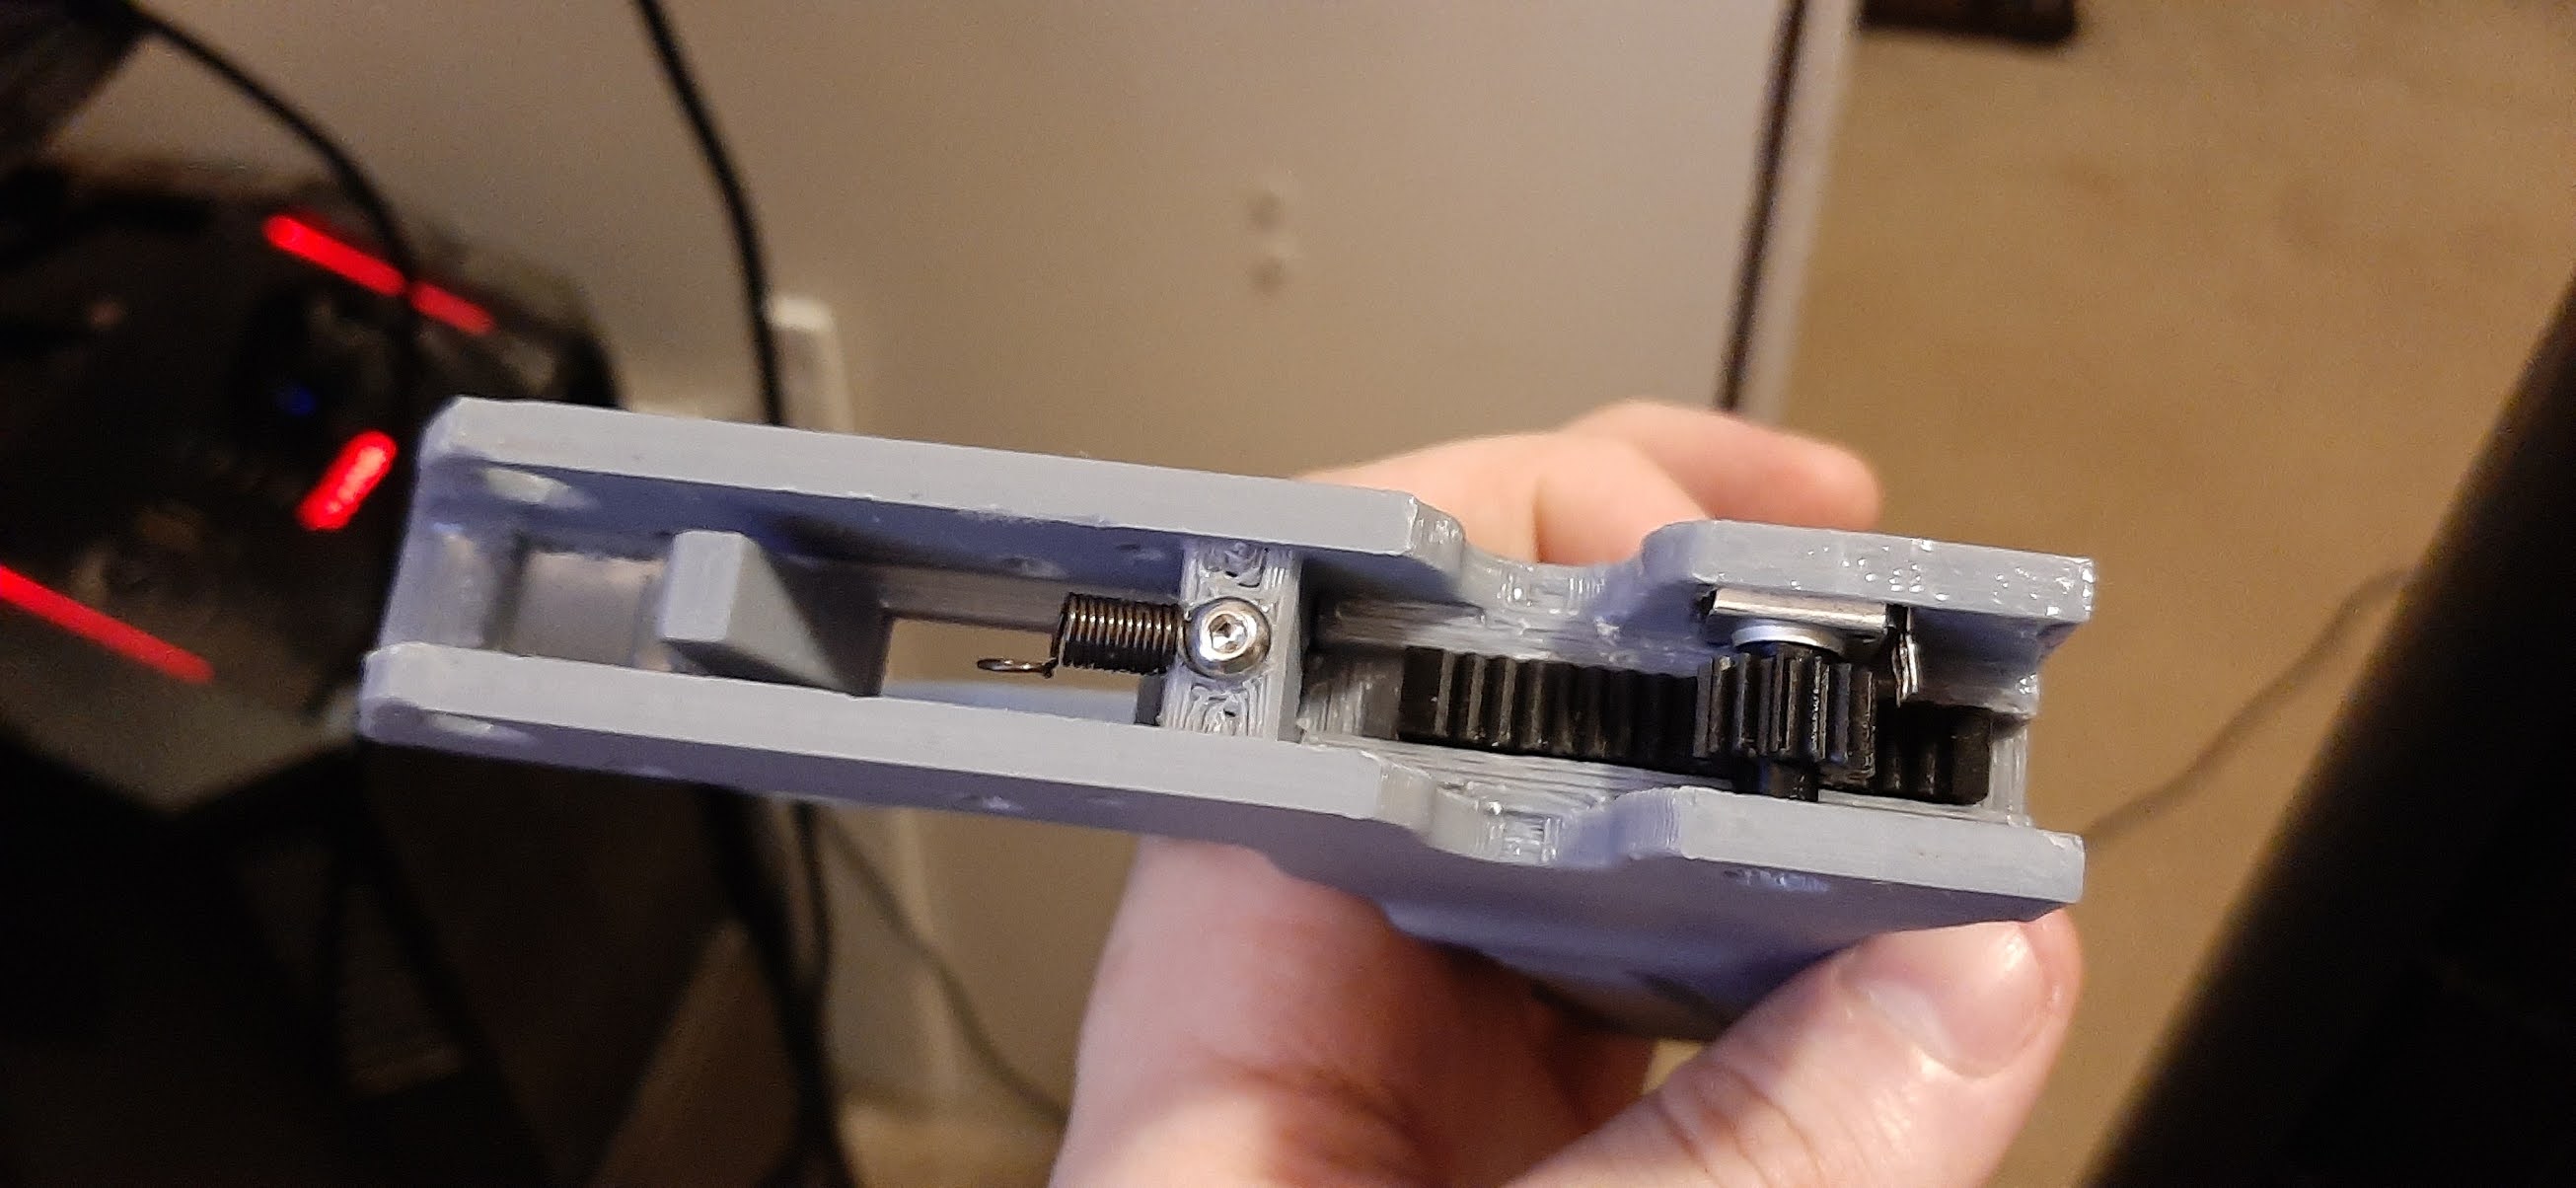
Eternally lauded as a complete and utter nightmare, this is the gearbox out of a FAMAS. This gearbox design first piqued my interest years ago as a potential candidate for strange rifle designs. The key factor for the Cybergun version of this gearbox that plays in its favor is that it is not a typical V1 gearbox - the piston, spring guideand gears are standard V2 style, the spring guide seems to be V3, and the motor is a standard short-type motor. The cylinder head is a V7 (M14), and the air nozzle is P90 type. The only proprietary parts in the gearbox are the trigger contacts, cutoff lever, and gearbox shell itself. That is to say, for all intents and purposes, this gearbox is fully upgradeable - a significant advantage over the standard V1 gearbox.

Here's where the challenge comes in.

For my VHS-2 project, I do not want a mechanical trigger linkage. I have owned airsoft bullpups before, and these universally suck. I want a trigger that doesn't feel like I'm about to break something every time I pull it, and to accomplish that, I'll have to get creative. I need the gearbox to not only cycle the gearbox only one time on a semi-automatic trigger pull, but I also need it to enforce cycle completion - to force the gun to cycle at least one time no matter how long the trigger is pulled - on every shot in semi-automatic. I can easily wire a microswitch or PCB button in front of the trigger, but how do I moderate gearbox operation in semi-automatic if I can't use the cutoff lever?
 
 
This is a Hall effect sensor. Hall effect sensors detect magnetic fields and blah blah blah. Why is this important? The Hall effect sensor isn't useful by itself. But connected to an Arduino running just the right code, and this thing will report every single time the sector gear moves. Using this, I can instruct the Arduino to close a MOSFET every time the trigger is pulled, and to not stop sending voltage until the Hall effect sensor is triggered to a certain degree. 

Hall effect sensors can report very quickly - this little guy will report up to 10KHz. That's a polling rate equivalent to reporting the sector gear status 10,000 times per second. Match that with an Arduino that operates at 16MHz, and we easily have the ability to read every single time the sector gear rotates. Using this principle, it's very simple to throw together a script that instructs the Arduino to act as we want it to. 
 
We are essentially building the world's most space-inefficient GATE Titan. All to avoid a crappy trigger. 

And that's pretty much the outline for the project. In the formal Part 1, I'll be assembling the "gas system", as it's the only assembly I have all the parts modelled to their final iterations so far. 

See you then.
-Craig, ETW